The galactic core of the Milky Way high in the skies above Big Island, Hawaii
The galactic center of the Milky Way is beginning to be visible in the Northern Hemisphere before dawn, as it rises on the southeast horizon. It will retroactively be visible for longer durations as the year wears on through October, when it aligns closer with the sun and is no longer visible.
Shooting the Milky Way can be very challenging, yet rewarding. The following will teach you everything you need to know to go out and capture your own view of our galaxy.
Equipment
A camera capable of long exposures and raw files (DSLR or Mirrorless)
You need a camera that performs well in low light. You will be shooting long exposures of 15 seconds or more at very high ISO's, so the more capable your camera is of making these types of exposures with less noise, the better. I recommend a camera that is capable of shooting a minimum of ISO 1600 with relatively little noise.
Capturing the Milky Way in an exposure is only half the battle. To make a really great image of our galaxy, you're going to have to do some post processing work. For this reason, it is crucial that your camera creates raw files ( and that you shoot in RAW). I use a Canon 6D for my astrophotography.
Lenses
The Milky Way composited over Coral Cove, Florida. The Sky was captured in Big Bend National Park.
I recommend shooting with a wide angle lens. Primarily because the Milky Way is incredibly massive! It spans the entire sky and achieving good composition with it will be a challenge. Once you become more comfortable shooting the Milky Way you can use telephoto lenses with larger focal lengths. To start out consider something in the 14-24mm range.
The lower the lens’ aperture the better, as you will be able to let in more light with a faster lens. My go-to lens for the Milky Way is the Canon 16-35mm f/2.8 L series II. Keep in mind, the 18–55mm f/3.5–5.6 kit lens that comes with most entry level DSLRs will definitely work as well, so don’t feel you need a pricey lens to get started.
As great as lenses with image stabilization are, it is not useful when shooting the Milky Way (or any tripodded long exposure). Image stabilization is basically a vibration to counteract possible camera movement, so if you're on a tripod it will basically cause motion blur. If your lens has image stabilization it needs to be turned off for astrophotography.
Finally be sure to remove any lens filters your lens may have, because these can contribute to lens fogging. If the humidity is high, I also use a hand warmer on my lens to help prevent fogging. I have read that this can heat the oil in the lens and cause damage, but I don't put much into that, as the lens doesn't get as hot with a hand warmer sitting on it as it would being left in the sun.
Sturdy Tripod
To make long exposures of the night sky (15 seconds or more) you need a very sturdy tripod for your camera. A cheap tripod can get you by for now, but if conditions are windy you may lose sharpness due to gusts shaking your setup. You can prevent or lessen this shake by using a sandbag or weight to hang from your tripod.
When shooting the Milky Way your camera will be orientated upward often. I suggest a 3 way pan/tilt head that allows the freedom to shoot with the camera at different orientations. Ball heads can also work, but it's more difficult to shoot align panoramas with one.
Remote Shutter or intervalometer
The Milky Way over the Jaggar Museum on the Big Island of Hawaii
If you attempt to trigger the shutter by hand, you will lose sharpness due to camera shake. A remote to control your camera’s shutter is absolutely essential for shooting the Milky Way. You can get away with using your camera's self timer but it will severely limit you. You may choose to use ‘Bulb’ mode on your camera rather than the timed shutter speeds. 'Bulb' gives you full control over how the long camera’s shutter remains open. If you choose this mode, you will definitely need a remote.
Remote shutters are reasonably priced. I recommend purchasing one with an intervalometer built in. They don't cost much more and will allow you to shoot continuously to create timelapses and star trails.
My setup
Canon 6D Body
Canon 16-35mm f/2.8 L series II
Promaster XC525 Professional with 3 way head
Canon Intervalometer

How to Capture the Milky Way
WHEN
While some part of the Milky Way is always visible, the time of year will have a drastic effect on what part you are able to see and how long you can see it. The galactic core lies between the constellations Scorpius and Sagittarius. Here in Texas, it is not visible during the winter months. When it is visible, the galactic core rises horizontally, then transitions to vertical orientation as it gets higher in the sky (sort of like the hand on a clock going from 9 to 12). Starting in March, you can see the Milky Way for about an hour before dawn as it rises in the southeast sky. As Spring turns to Summer, it becomes visible for the entire night starting at dusk.
Another important factor to consider when planning to shoot the Milky Way is what phase the Moon is in and its position in the sky. Light from the Moon will wash out the Milky Way and the surrounding sky, giving your image less contrast. For best results, plan your shoot when the moon is in a waning or new stage.
There are a bunch of apps that will help you determine what part of the Milky Way will be visible and its location compared to the Moon. I use an app called Planets, it's free and really simple to use. You just install it and point your phone in a direction, it then shows you the stars, galaxies, planets, and constellations you're looking at. There are also some paid apps such as Planit! and Sky View. You can even use an online star chart, which is what I started out using.
Planets screenshot showing horizon.
Planets screenshot showing Milky Way, Moon, and planets.
Where
You have to get away from light pollution (the further the better) to capture the Milky Way. While it isn't impossible to shoot it near cities, to get truly amazing images you need to be in very dark location. I use LightPollutionMap.info to get an idea of how much light pollution I will be dealing with.
Think of this like a weather radar map, except it's light pollution instead of water.
This map shows the intensity of light pollution. White areas are the brightest and black areas are the darkest. These values, along with the gradient in between visualizes the Bortle Scale. Unless there is a mass blackout, you will be unable to see or photograph the Milky Way from the Red and White zones (where cities are). While it is possible to capture the Milky Way in an Orange area, it will be washed out and there will be a lot of light pollution on the horizon. I recommend shooting from at least the Yellow regions. While Green and Blue zones will give you fantastic results, getting yourself into Gray and Black regions will yield an explosion of stars for your eyes and camera.
Milky Way over the San Fernando Academy ruins in Pontotoc, Texas.
Remember it's not just the light pollution at your location, but also the direction you will be aiming your camera that needs to be considered. Refer to the light pollution map. If I were shooting the Milky Way rising in the southeastern sky from the town of Mason, I would be standing in relatively minimal light pollution. However, I would be aiming my camera back towards Austin and San Antonio, and would therefore be dealing with considerable light pollution along the horizon in my image.
For me, getting into dark skies isn't enough. I try to find something to anchor the foreground and add interest such as rolling hills, mountains, or abandoned places and things. There are tons of images of the Milky Way out there. Find something to make yours stand out! I often use Google Streetview to try to find interesting foreground objects.
Weather
The weather can have a tremendous impact on your night photography. If the sky is overcast, you're not going to be able to shoot the Milky Way. When first starting, I suggest going out on perfectly clear nights. Once you get some experience, you can venture out when there are a few clouds, which can add to an image. A quick look at your 5 day forecast from your local National Weather Service office will give you a good idea of what conditions will be like for the week.
If conditions are favorable, then refer Clear Dark Sky. This website provides an astronomer’s weather forecast for the next 24–48 hours. It gives you a forecast of the cloud cover, humidity, temperature and other conditions which will help you better plan your shoot.The website gives you forecasts for thousands of locations across North America.
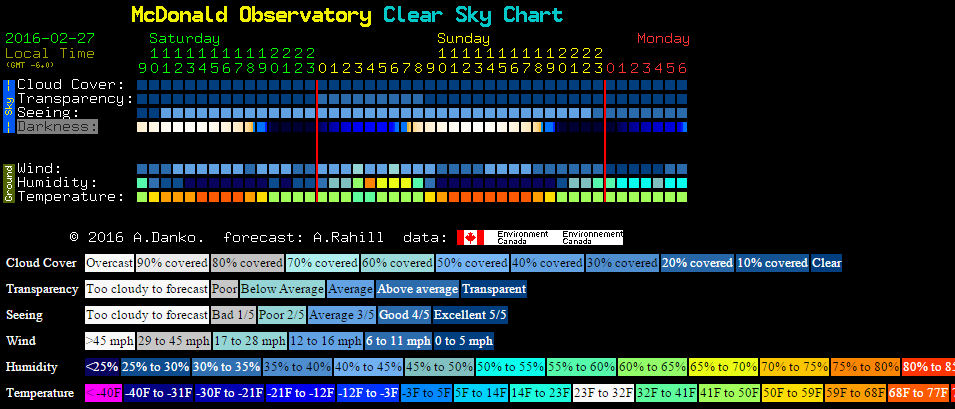
The above image shows various rows with each column corresponding to an hour of the day. The site gives you a legend showing the meaning of each row. The most important rows for astrophotography are cloud cover and darkness. Cloud cover gives you how clear or cloudy the sky will be. Darkness shows you how dark the sky will be. Dark blue is the darkest and light blue means the Moon’s or rising/setting Sun's effect will brighten the night sky. Daylight hours are depicted with white.
Making Your Pictures
Okay, you have chosen your location. You know where the Milky Way is going to be and how much light pollution you are dealing with. The Moon isn't going to interfere, nor are clouds. You arrive at your location, setup your tripod, camera, and remote. Now the fun begins. Astrophotography is much different than other types of landscape photography. Often you are in the middle of nowhere, it's pitch black. It can be a little creepy at times, especially when you're in the middle of nowhere and all you can hear is wildlife rustling about. Once you get past being far away from anyone and your eyes adjust (which takes a minute or so) you will see the Milky Way as it was seen by people thousands of years ago.
Exposure blend of the Milky Way over lava flow on the Big Island of Hawaii.
Focusing
Since we are focusing on the sky, we will need to set our focus to infinity. When focusing on a totally dark scene, it will be nearly impossible to use autofocus. You will need to switch to manual focus and use your LCD preview screen to see what you're doing. To achieve tack sharp focus. I generally focus on a distant light or bright star by enlarging it using the zoom feature on the preview screen.
Shutter speed
Given that the Earth rotates, objects in our night sky appear to move over time. This is called parallax and is what creates star trails in images. When you're shooting extraterrestrial objects you must be aware of this or your sky won't be sharp. So without getting into the world of star tracking mounts, you will only be able to have your shutter open for a limited amount of time.
You can calculate your maximum exposure time by using the 500 rule, which is as follows...
500 / (focal length x crop factor of your camera) = maximum exposure time
Full frame sensors have a crop factor of 1x, so they are able to achieve longer exposures without showing parallax than APS-C (crop) sensors which have crop factors of 1.5x and 1.6x, depending on make and model. Using this rule, I can calculate the exposure for my full frame Canon 6D with the 16-35mm f/2.8 L II when shooting at 16mm focal length.
500 / (16 x 1.0) = 31.25 seconds
Aperture (or f/stop)

The wider your aperture is open, the smaller the number. You're going to want to let in as much light as possible, so you will mostly be shooting at your maximum aperture. For example the 16mm lens I use has a maximum aperture of 2.8, so that is usually my f/stop.
The only issue with this is maximum aperture yields the least depth of field (sharpness or lack there of) in your image. If you focused on infinity your sky will be sharp, but you're foreground won't. I often will take a second exposure, and refocus on the foreground so I have both a sharp foreground and sharp sky. I usually shine a flashlight on my foreground object, then focus in the same manner previously described.
ISO
If you're not dealing with much in the way of light pollution, you will want to use the maximum ISO your camera is capable of before noise starts to degrade image quality. For a Canon 6D, that's around ISO 6400, so I usually shoot with my ISO there. I also try to fire off a few exposures at lower ISO's as well since images shot at a lower ISO are less noisy.
Composition
With the advancement of the technology and affordability of digital cameras, capturing the Milky Way has never been easier. There are millions of images of it floating around. The key, as with all fields of photography, is making yours stand out.
Try playing around with lighting your foreground with a flashlight or speedlight. Images with detail in the foreground are a lot more interesting than those with a pure black foreground.
While a lot can be said for The Rule of Thirds and The Golden Rule in composition, I believe the most important thing is that your image has a definite foreground, middleground, and background. For instance in the image below, the foreground is the bluebonnets, the middleground is the mountains and airglow, with the sky being the background.
I will generally start out trying different orientations (landscape and portrait) as well as panoramas if the situation allows. Once I get a good frame set, I start my intervalometer and begin shooting continuously to create a timelapse. This is my favorite part, the camera is setup and running, and I am simply left to gaze into the heaven's above. Sometimes I get lucky during my timelapse and even catch meteors!
Editing Your Pictures
Don't be upset if the images on your preview don't look anything like what you are used to seeing online. Many of the most popular Milky Way images are a blend of multiple exposures and/or composites. You can work on those types of projects once you build a body of long exposure work.
The most important thing right now is that you are shooting your images in RAW format (not convinced? Read this.). RAW files contain so much more detail than JPEG files, which will give you tons of room to play around in post processing, and allow you to bring out the fine details of the night sky.
Unprocessed Milky Way RAW. Notice the light pollution. I was in a "Yellow" zone.
Quick and dirty edit. Notice how much detail was able to be pulled out.
I could do a lengthy blog post on editing the Milky Way, but the truth is there isn't a one size fits all process for editing these types of images. This is where you and your style comes in. Below is a video tutorial on editing astrophotography in Camera RAW. This is just a start and there is still plenty that can be done once it is opened into Photoshop.
I also cover editing in depth at my Astrophotography Workshops, so if shooting the Milky Way in some of the best skies in the world, learning how to edit your images like a pro, and having a lot of fun while doing so interests you, be sure to check them out.