
Introduction
Adobe or mud brick (also known as cob, cobb or clom) is a natural building material consisting of some ratio of soil, sand, clay, water, fibrous plant material or manure. The basic premise being that once the water has sufficiently evaporated, the mud adobe shrinks in size as the tiny clay particle move closer and closer together forming tight bonds and a dense mass of soil particles is created after the water has been removed. The addition of fibrous plant materials (digested or otherwise) also lend to the strength and insulative properties of mud bricks. Cultures around the world, both ancient and modern, have known that adobe makes for an ideal natural and sustainable building material. It promotes healthy indoor air quality by binding up harmful are pollutants, has excellent insulation properties, and is chemically unaltered in any way. It is basically compacted dirt so if the structure needs to be destroyed then all you need is a sledgehammer to smash it back into dust. No landfill needed and no toxic compounds to dispose of. If kept from the rain or a driving dust storm by covering with water resistant stucco or by deep roof awnings (or the side of a cliff) mud structures can last for hundreds if not thousands of years.

Luckily for us there is plenty of ready made building materials right under foot here in the desert southwest. After digging our dessert garden plots during winter break a few years ago we had A LOT of extra soil piled up around the yard. At first I wasn’t completely convinced that our desert soil with layers of caliche (a hard calcium carbonate based mineral deposit) running through it and gravel, ranging in size from peas to peaches, was necessarily suitable for oven building. After doing a lot of research there was a surprising lack of information on the internet that discussed adobe making with any detail using our native soil types so I broke down and bought a book “Build your own earth oven” 3rd edition by Kiko Denzer and Hannah Field.

It was a pretty good resource, a little unorganized and vague at times (to their defense it is actually a pretty unexacting and forgiving material to work with), but non-the-less a great reference. It doesn’t specifically discuss using southwest soil types and mainly limits its focus to soil of high clay content like that you would find in parts of the mid- and north-west that requires amendment with sand to adjust the ratios for a proper building material. I would say that in order to understand the basic concepts of successful oven building that this book is something you may want to at least read over once or twice be for you even think about putting a shovel in the ground. There are some youtube videos out there that might help as well. My goal with this post is to provide some basic steps in building an oven with desert soils that elaborate on established methods and other available references.

Step 1: Soil assessment
Checking your build soil. Before construction begins do a quick shake or sedimentation test and make a test brick or ten to further insure successful adobe building. Some practice for getting a good feel for the correct mud consistency as it relates to a proper mud brick will help a lot before you get to building. The shake test simply consists of a clean glass or plastic jar about the size of a medium sized peanut butter container filled half way with a good representation of the building soil and filled to about an inch from the top with water. Tightly cap the lid and shake for a minute or two, quickly setting upright on a flat surface as soon as you stop shaking. To estimate your soil’s composition you need of a ruler with centimeters and millimeter increments. After an hour or two come back to your experiment and see what it looks like. Is the water still cloudy? If so, good! This usually means you at least have some clay in your soil so give it another 8 hours or more to finish settling out. It seems to reason that if the water fraction of your jar has become significantly clear, then it may be a suitable time to measure it! The top light layer (see photo) will be the clay layer. The one below that is silt. The others layers are larger particles like sand and gravel. We are mostly interested in the top layer of clay as long as the silt layer below it does not exceed 30-40 percent of the total. To do this simply take your metric ruler and place it next to the jar and measure to the top of the clay layer. So for example let’s say your soil settlement height is 10 centimeters and the top layer is about 1 centimeter. One divided by 10 is 0.10. Move the decibel place over to the right two places and then you have 10.0 or 10 percent! Yay metric units!
After attempting to identify the correct ratio of clay to water to sand for our soil type I found that there really is no single answer. Too much clay is not a huge problem just add sand (which is east to find) to get a final soil mixture of around 10-30%. Too much silt >30-40% and you might want to find some other soil. Too little clay, let’s say <10%, and your bricks won’t stick together os you will need to either buy/find some clay to add or just find some better soil. Luckily, the soil that was piled in our backyard had about 12-15% clay. I mixed up a few test bricks by adding enough water to form a dry-ish concrete like mixture and stuffed them into a crude brick form. After yanking the form off while wet to form the brick I let them dry for a few days in the sun. Turning on their side after they harden up to aid in drying will speed up this process. To test your bricks for acceptable build-ability grab a nail and give it a scratch test. If the brick seem hard and difficult to make a deep mark and little material scratches off you are on the right track. I have seen a few references suggesting the “drop” method as a good way to evaluate your material. Simply pick up one of your brick to shoulder high and drop it on the ground. If you get a small break or no breaks and the inside is nice and dry you have achieved the correct building ratios. If it crumbles into little pieces try again because it won’t support any building activities.

Getting a reproducible mud mixing system was a bit difficult at first but to try and get you on the right track I used, for my shovel and soil, about 30 shovels of build soil to about 4-5 gallons of water mixed in a wheel barrel being sure to pick out any large sticks or rocks bigger than an inch or two. The mix on a tarp method suggested in the book, does not seem practical for someone who owns a wheelbarrow but it works pretty well in a pinch and takes a little less effort on your back. If I were a rich man I would go by a concrete mixer but I think I would miss the workout you get out of hand mixing. I say that now but a large project might require it. Once you get the hang of it, it becomes a little addicting because you can build just about anything you want given the time and back muscles.
Step two: Decide on a location
It would behoove you to think about this carefully. You are creating a very large very heavy earthen-based object that will produce an incredible volume of heat, smoke, and flame that absolutely does not tolerate the wind or rain. The opening of the oven should not, if possible, be focused in the direction that the wind typically comes from in your area. If you do not pick a good location then the weather will be predicting your next pizza party and not you. Also your oven may or may not be equipped with a chimney and while learning how to use it you will create a considerable amount of smoke. I would not advise placing the oven up wind of your neighbor or your own house to keep from being too much of a nuisance to the wife and/or neighbor. Rain (moisture) will destroy your oven quickly. Therefore, if it is an untreated surface like mine then you will need to either build a permanent shelter or use a heavy duty tarp or temporary shelter system that won’t blow off in a big storm. See Denzer and Field for more options.

Step three: The foundation
There are several other important considerations for placement of the oven foundation. Some questions you may want to ask yourself while deciding on a home base are: Is it in the middle of a run off area? What type of material will you be building it with? How solid is your back and how much money are you going to sink into this thing? See Denzer and Field for several styles and additional options. Acceptable build supplies can be found just about anywhere, old brick, rocks, logs, hunks of concrete, or anything cheap/free and reused is most ideal. Depending on your soil type and climate you may want to build your oven on a solid foundation. In Tucson, monsoonal rains can erode the base bricks out from the bottom and make sure the ground you put it on is level and well compacted or raised and made of something indestructible. Lay whatever you can find that is sturdy as the first course of brick on level ground. We used scavenged cinder blocks, not pretty but it works and the bricks were free.
For our oven the only building materials available were two cubic meters of soil and a few free weekends so I had to get a little creative. In order to make the brick for the base I assembled a 7 brick frame from scraped 2x4s with brick dimensions of 6 inches by 12 inches and 4 inches deep. Don’t have a frame? Try your hand a free forming them right on the ground. Takes way longer but it is not as hard as it sounds. The 7 brick frame was sort of a mistake as it was far too awkward to handle for just one person. If you are attempting this yourself I would suggest using a brick form in the 1-3 brick range. A smaller frame will make it much easier to un-form the bricks. The brick size is up to you. I would not go too much smaller because it will take forever but too much bigger and they will become hard to manipulate. Adobe bricks used in home construction in New Mexico are traditionally 13x14x4 and can weigh around 80 lbs!

You will also need to estimate how many bricks are needed to build your structure. I would suggest making about 10% more than is needed. During brick making we suffered about a 5% error rate during the process. The unit of measure for the base of the oven will be in brick “units” so it will be easy to build without needed to cut half bricks. Our oven base is 3 bricks deep by 3 bricks wide (about 4 feet by 4 feet) and 8 courses high. 9 bricks in a course x 8 courses give you 72 so we needed about 80 plus. At this point I would like to suggest thinking about building a cubbyhole under the oven to store firewood. This will require another at least another 24 bricks to be thrown depending on your design. I would suggest finding some designs on the Internet for inspiration. A simple arch pattern will be structurally sound, look impressive, and give you a dry spot to store fuel.
Step four: The mixing of the muds.
At first a lot of effort went into trying to exact this process but as mentioned above for the mud bricks I found that by shoveling in about 30 shovels of dry dessert soil and slowly mixed with about 4-5 gallons of water to reach the desired consistency. The exact ratio is not important here, it is the properties of your mixed mud that will dictate how much water to add to your build soil depending on the level of moisture your soil has on the given day. Once you achieve something that resembles a dry concrete mix with, and let it sit for 20 minutes or longer to let the moisture even out and hydrate all the soil particles. We want our soil to be saturated to the point where it just comes together.

In order to really get a feel for what the mud should look and feel like a little experimenting and practice will speak volumes. The general idea here is that the mud needs to be dry enough to be thrown into the forms, yet wet enough to fill out the full mold without having to spend a lot of time forcing mud into the corners. It also must be able to be easily released from the form, and then when unformed not slouch too much. Meaning you want a fairly sharp and flat corners and sides. I suggest mixing up a few very small batches of mud and get a few throws in before you try full-scale brick production.

Step five: Adobe brick production
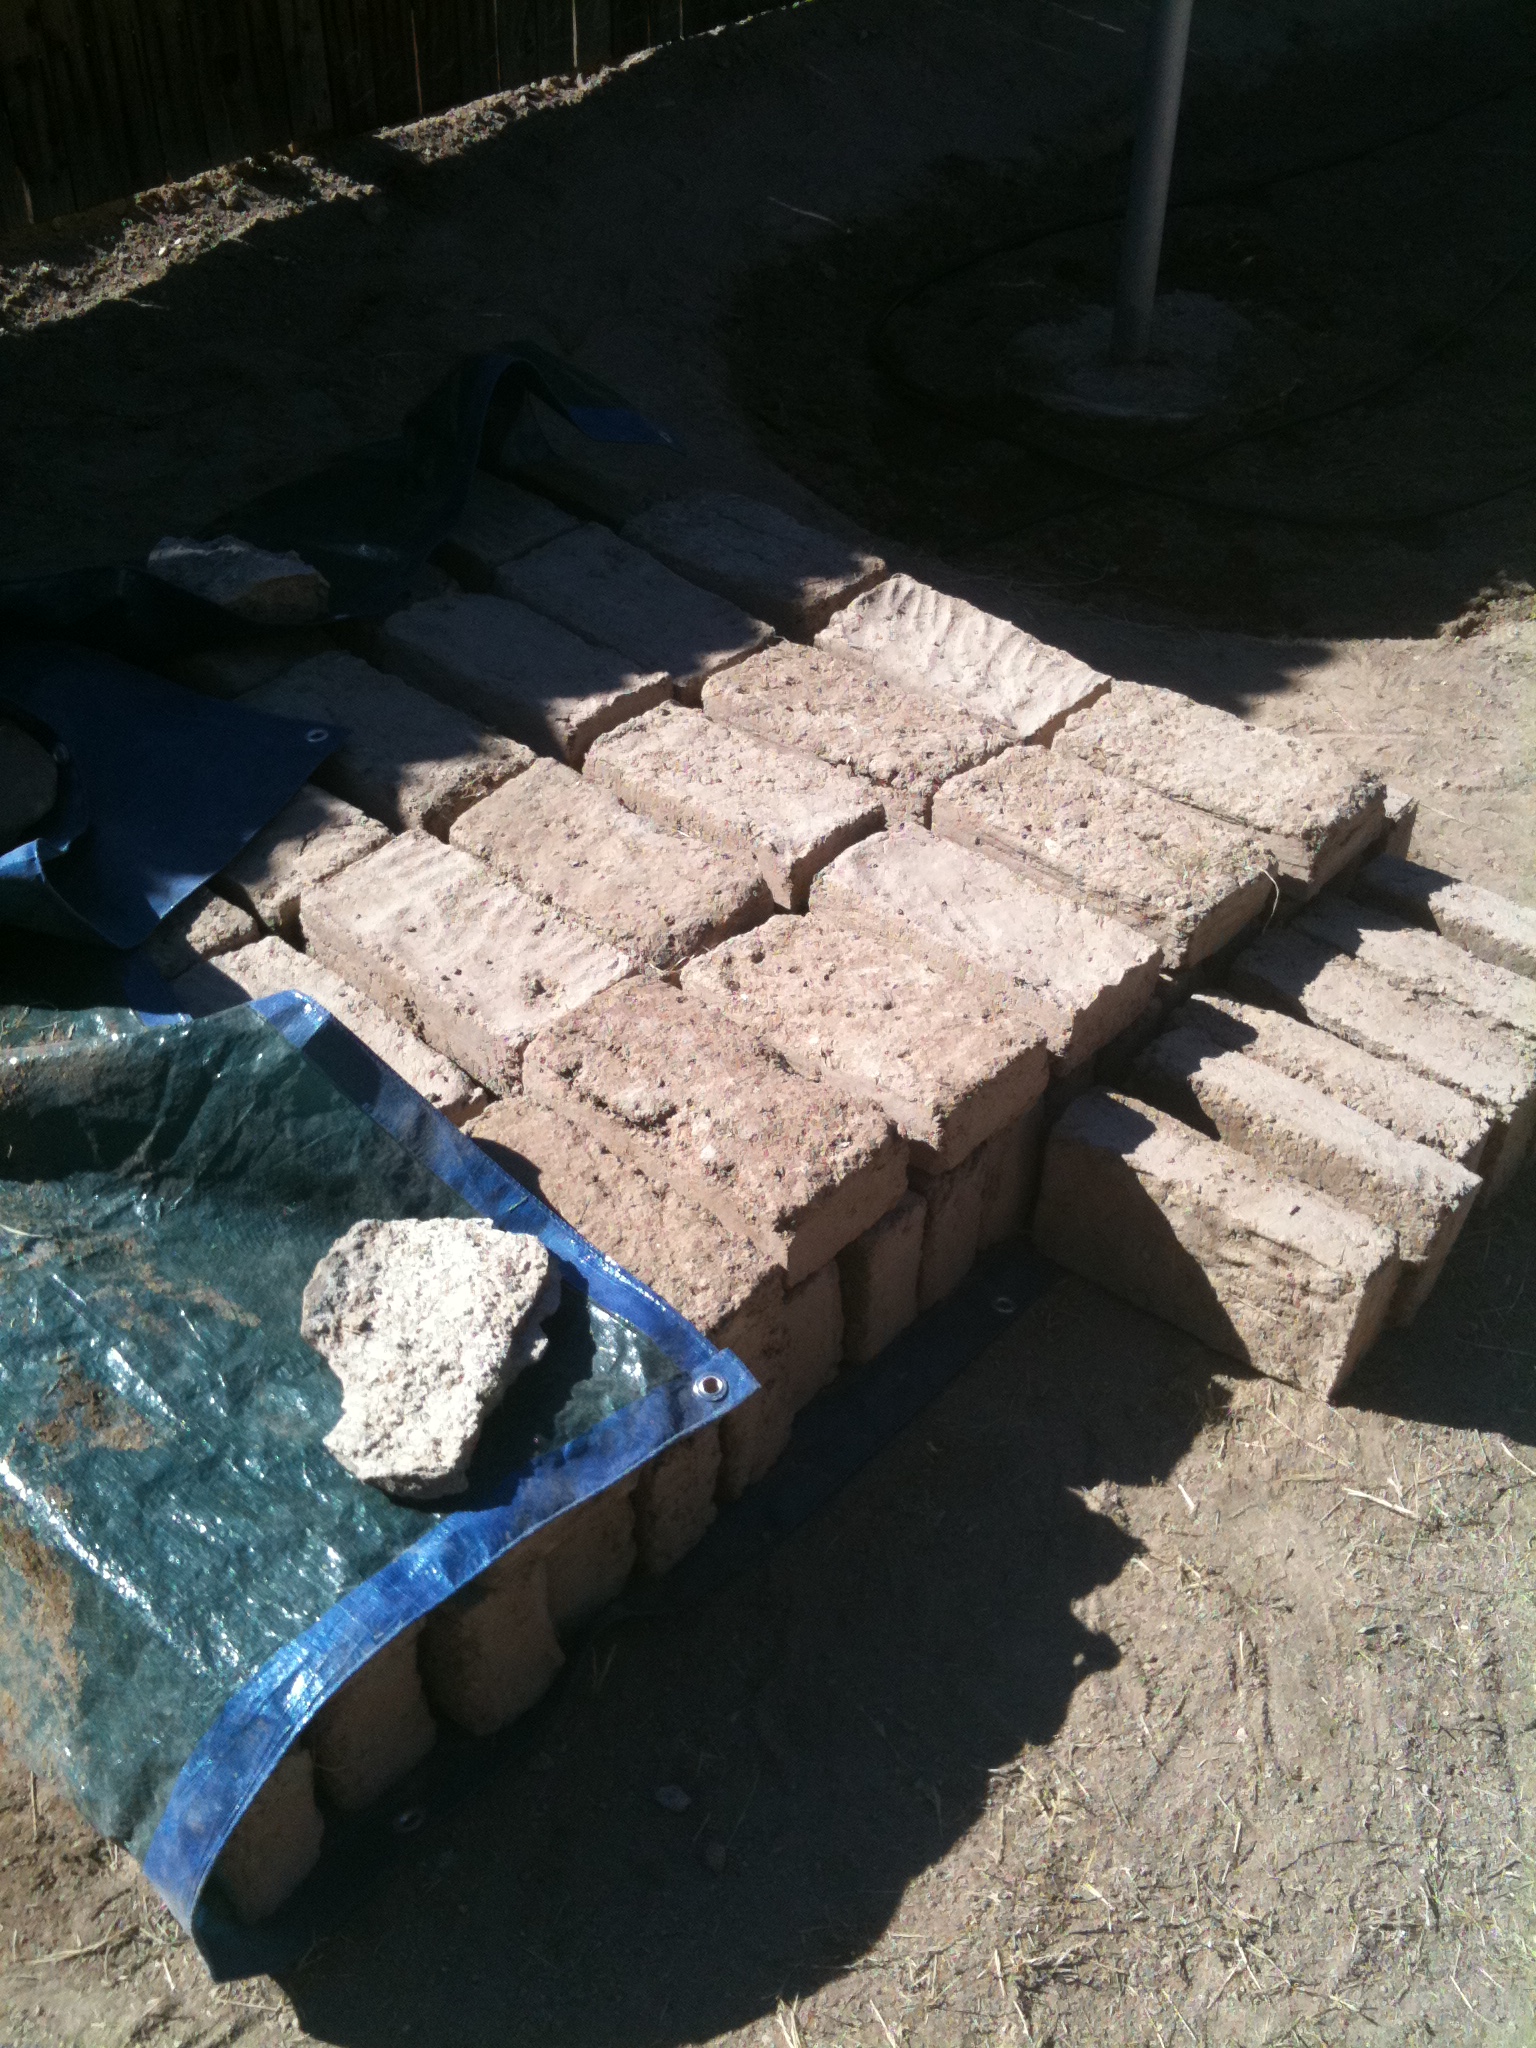
Brick making begins by hydrating and mixing soil in small batches as need or the mud can be put in a tarp lined pit in the ground will hold it for a day or so depending on conditions. Then find a flat, dry (preferably shady if it is really hot out) area in the yard to lay your form and shape the bricks on. Keep in mind that a lot of the moisture will be wicked away from the bricks by the ground, no need for a tarp. If you have grass you can throw them on the grass with no problem but it WILL kill your grass (that’s ok because it will give you an excuse to switch over to veggie gardens or zero-scaping anyway!).

Once they are formed the bricks are far too fragile to mess with at this point so don’t lay them somewhere you will need to be messing around for the next few days. After the color has significantly lightened and it is difficult to scratch the surface with your fingernail you will want to carefully loosen a few from the ground and set them on their sides. If they can be manipulated without crumbling apart then you have the green light to move ahead. I used an old butter knife to square up some of the rough sides and corners, as well as remove any excess soil from the bottom that may have stuck during the curing process. Continue drying by setting all of the bricks on their sides and let dry until very light in color and a steel nail has a hard time scratching deeply into the surface. Ours took about another week to dry completely after I turned them up on their sides. An important note here, do NOT lay the bricks parallel to each other like a domino rally. Something like this: =ll=ll=ll=ll= will do nicely. Do you see what I am getting at? I broke several bricks by lining them up in parallel and then tripping over the first in a series.
Step six: The base
As I mentioned before, the base can be made of anything. It can be made at any height or size, pending your final oven diameter. The only important things to consider here are that the top row of base bricks remain as level as you can make them, and that the foundation that the base sits on is solid. Our oven floor is about 45 inches high and works for our needs, though if I had to do it again another 8 inches would be nice to keep the smoke out of your face.


Adobe bricks lay just like any other brick or masonry work. The mortar is the same mud that you use to make the bricks only with a little more water added and all the larger particles screened out. To screen the soil you will need to get some wire screen or hardware cloth that has about a half inch spacing too it. Stapled this screen to a wood frame made from scratch lumber and sift your build soil through it.

If you don’t do this step you will have a hard time with your spacing. Your hands are great tools to apply much with but you may want to employ the use of a small shovel or trowel to spread your mud. Try and keep your grout lines consistent at about 1.5 inches and the corners square. This is easy to do with just three bricks a side but you must keep in mind that the bricks need to be layered so that the vertical grout lines do not line up with the ones below it. Overlapping them will make the base very strong, and If you take the time to make sure the first two rows are perfectly square and level then the rest of rows will only require a few quick checks with the level. Start to finish, about 4 hours for the base. I would recommend not filling the base for at least a few days to allow the joints to cure and the mud to fuse together. Our base is filled to within about 16 inches to top with rocks, cement hunks, old bricks, and soil. GENTLY tamp this mixture down with a 2×4 so that it will not settle too much. Do not tamp hard or you will blow the walls out.
Step 7: Oven floor
The next step is somewhat explained in the book, but I don’t know that I totally agree or really grasped the concept the authors are trying to make. In principal if you were to put the floor of the oven directly on the ground, the ground would pull a lot of the heat energy away from the firebricks layered in the floor of the oven. This is obviously not desired as we would ideally like to heat these bricks as hot as we can get them and have them hold heat for as long as possible. The book suggests taking a bunch of beer bottles (like you see in the picture) and create an insulating void of porous mud and air cavities created by the bottles underneath the oven floor. Since air is a very poor conductor of energy this makes since, and you’ll find an immediate reuse for all those beer bottles you drank while working. The authors suggest using wood chips, perlite or straw as an additive to your building soil as mortar to cement the bottles in place below the subfloor. They lead you to believe that heat generated from the oven will head these wood chips up to a point that they will incinerate and cause a small void in the mud. They also suggest that the voids left in the mud, along with the bottles will act to insulate the oven floor. However compelling this argument may be I am not sure the firebricks can transmit enough heat to get hot enough to burn up plant fibers to ash on the other side. I have no direct evidence to refute their claim, so I blindly followed suite. I used wood chips mixed with mud for our subfloor because its what I had in the barn, but I think perlite would probably do just as well and provide a better insulating effect.

As diagrammed in Denzer and Fields there are a number of ways to construct the rest of the base and oven floor. Our oven base was back filled with rubble like rocks and broken bricks until half full. Two layers of beer bottles were then mortared in place with the basic building mud mix with about a 1/3 the volume dried pine chips and straw. On top of this layer of bottles I placed a 3-inch layer of dense oven mud, which is just the normal screened soil, but with a little less water added (more on this later).

The dense oven mud subfloor under the firebrick must be level and not directly touching any of the base walls. The gaps can be filled with bottles and sawdust or straw adobe mix. Once the subfloor is built and level you can let it dry or continue to lay the firebrick floor. Denzer and Moore describe a number of ways to set this up and I will leave it at that, as there are a lot of ways to set up the floor and none probably more or less correct than the other. Perhaps most importantly make sure the firebricks are level. You can cement them in with oven mud making sure no debris work their way in between adjoining sides. To do prevent pushing sand and gravel into the joint simply slide the brick down the face of the other brick to place. Let the structure dry out for a week. At this point you will want to start consider how your door is set up and play with a number of different arrangements.

Step 8: The oven dome
In my opinion the oven dome is the most difficult part of construction. The book lays out the basic principal and ratios of door height to dome height. The best way to approach designing and building your dome and opening is to use extra bricks, cardboard, wood blocks, etc, to mock up the door opening. The book does a good job of laying this out. I will leave the detailed descriptions to them. For our oven I constructed a few mock-ups of the door and chose this one (image above).
If possible, a cloudy day or a cool morning or evening would be best for attempting the dome construction. Hot sun will make it difficult to keep the sand mold wet enough to build on. The book describes using a “denser oven mud” for construction. The point, I think, is to make a dryer more packable mud consistency for the dome. I used my basic adobe mud ratios and used about a gallon less water. I then mixed the mud a lot, almost kneading it. Cover up your mix with a tarp to let rest and turn your attention to building the sand form for the dome.
The easiest and probably cheapest way to build the dome is out of basic brown play sand. Any sand that is good for sand castle building will work well for this application. For our dome size I had to purchase about 5 cubic feet. However, you can also take some left over bricks, rocks, chunks of concrete, etc. and stack them into a pyramid shape in the middle of the oven floor. This does two things for you, it provides a strong base for the sand castle you are about to build and you don’t have to buy so much sand. NOTE: Make sure the pieces of whatever you use will fit through the oven door, as you have to remove them later when you dig out the mold.


No matter how the dome mold is constructed, getting a “good” shape to the dome is important as it will effect how much fuel is required to heat the oven. A correct shape will allow good airflow into the fire affecting how well the fuel combusts. It will also limit what sized items you can cook in it. Again the book does a good job at laying this concept out with greater detail. To keep the mud from sticking to the form we used wet newspaper to separate the sand from the mud and it worked just fine. I don’t know if plastic would be a good idea because pieces of it can get stuck in the mud dome and tear off. The only option then is to burn them out, and burning plastic is not exactly healthy. Assuming care was taken to estimate how much mud will be needed (make a lot more than you think) for the oven dome the process goes very quickly. The book once again does an excellent job elaborating on this technique. The most important thing to remember when building the first layer is to compact downward not towards the base in concentric rings making sure to not let the layers dry out as they are being laid. For our oven I was able to put both layers of the dome up in one morning. We then let the whole thing set for 24 hours and then began to carefully excavate the sand mold out. I left the newspaper to dry out for another few hours before removal and it came out in big pieces without too many problems. Small pieces left behind can safely be burned way during the first firings.


The second oven dome layer (which I did not get a pic of this process because I was COVERED in mud) helps insulate the dense oven mud dome and is made of a slightly wetter oven mud mixed with straw or wood chips mixed into it to form a light packable mixture. The basic idea with this layer is to make a thermal layer full of air pockets, created by the straw or chips, to help insulate. It is not necessary to have a layer more than 3-4 inches in thickness. Remember that the thicker the walls the more energy is require heating up the increased mass. Deciding how thick the oven wall is a bit of a trade-off. Our oven is about 7-8 inches thick, it takes about 3-4 hours to put enough head energy into the oven floor and walls to keep it at temperature long enough to cook for an evening. Heating times will also depend on the fuel type. Denser woods like hickory, mesquite, pecan, and oak provide the most amount of energy. Trying to cook with pine or other less dense wood will work, but smoke becomes an issue and the oven will not achieve as high of temperatures.
Once the oven is constructed let the dome dry very slowly. I would go so fare as to cover with a tarp especially if its hot out. You may also want to burnish the final coating of mud with a steel spoon, this will act to compress the outer layer and make it more resilient to erosion. This step is best done 12 hours or so after the final mud layer goes on. With our oven we waited till the next weekend but it is also ok to start small drying fires on the inside after a day or two of drying. It is important to slowly build up to larger and larger fires.

Too much too fast and the inner oven wall may start to crack. Some cracking of the outer wall is to be expected as the inner dome will expand considerably faster then the outer cob insulation.

Cooking with wood
With a little practice at managing the fire it becomes easier to construct fires with little smoke or hassle. A few rules of thumb mentioned in the book are to always use dry well cured wood and keep the pieces small about 2 to 3 finger width at most (especially early in the burn), and then once the oven begins to heat up larger 3 to 4 inch logs can slowly be added to the fire. A good way to tell that your oven is beginning to heat up is to observe the black soot on the inside of the oven wall. In most cases the soot will begin to burn off at about 750 F. This is not a time to stop adding fuel but to begin increasing the size of the logs and heat for another hour or so or until you hit about 850 – 900 F before you starting backing off and begin cooking.


When we are ready to cook we usually just brush the coals and fire to one side and clean the deck with a damp towel on a stick (this process is known as waddling). At this point the oven is hot, really hot like burn all your arm hair off hot. After a long burn our oven typically gets up to 1300 F. While the oven is really hot (900-1000 F) is the best time to cook in my opinion. The book says wait till it cools a little before you begin cooking. This is true if you are going straight to breads, which will burn in seconds, but after all the effort letting the heat go to waste like that seems foolish. The kitchen stove can’t hold a candle to the type of heat that is put out by an adobe oven. We use the oven as a sauté station to start off. All metal cookware like cast iron and steel can go right on the hearth. Braised meats can be seared in seconds without smoking up the house. There is also plenty of heat for authentic Chinese wok cooking something that can’t normally be recreated on the home stove. Also certain veggies like chilies and peppers can be skinned rather quickly at these really high temps. A digital infrared thermometer would make for a great investment at this point. Flat breads and pizzas anywhere from 600-900 degrees, non-enriched breads like French bread and artisan breads from 700-500 degrees, enriched breads and other baked goods below that. Once the temp drops well below 250 degrees the oven can be used to dry veggies (kale chips!) or jerky overnight. You can also dry damp wood for the next fire but make sure it’s below 250 and leave the door slightly open! Any residual heat the next morning can then be used for yogurt or other thermo fermentable items. The remaining ashes are collected and distributed in the garden or added to the compost for nutrients. Not too much though because it will increase your soil pH.

Protecting the oven from the rain and wind is really the only maintenance required and built in a good location under a permanent structure keeps you from rushing home to throw up tarps before a storm. Compared to a metal grill it doesn’t need cleaning (other than sweeping out the ash). An adobe oven is cheap to build if you can salvage and own property with good soil. Our bill was $10 for a bail of straw that I used half of and the purchase of firebricks for about $50 (but only because I could not find any used ones and was tired of looking). The total time invested was probably around 40-50 hours spread out over three-four weeks. However, the whole process can be sped up and complete over a few days. Good luck building your own! Send me an email at urbandesertgarden@gmail.com com should you have any questions.


